Wednesday, April 26, 2023

Yes, Really, I’ve Taught Card Classes!


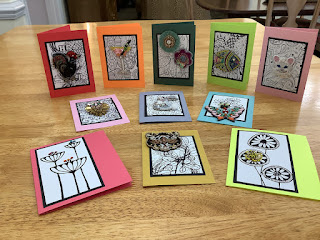
Everyone knows I make art, not cards.  Of course the secret is to make my art in miniature and then mount those little creations on the front of a card.   


I love quirky things far better than pretty.  Can you tell?


And if I can include rubber stamps mixed with my overflowing collection of old b&w photos, that’s even better!


Have you joined me in the last few years for a card class?


Maybe in a Christmas class that included cards?  Those were popular the last 2 years.


Or a fun class mixing vintage ephemera from my antique shopping.


Or in a fancy fold card class?  That class sold out last year at Stampaway.  And because I have my moments, and in a rush discovered I can’t count, 36 ladies made 9, not the advertised 8 cards, in just 2 hours.


At Summer Stampfest  once we made oodles of cards and played with beads and dimension, embossing, and so much more.


What I’m saying is this year at Stampaway I’m teaching not one, no; not two, but actually THREE card classes!!  Oh my!  Teaser…the next post is a sneak peek at some of those cards.  

Monday, April 24, 2023

Linda, Where have you been?


I’ve been missing in action from my blog for a long time, but I’ve been a busy girl.  Still creating art.  Still traveling.


We lost Mother in October of 2022 after a years long battle with dementia.  She kept us busy and entertained until 2 weeks before she left us, and we loved every minute of it, good, bad and ugly.  The memories are strong and her trinkets and photos are everywhere as daily reminders of her silliness and love of life.

Stepdad Tommy continues to join us for events large and small and we look forward to celebrating his 91st birthday in June.

Little brother moved an hour away.  Big brother moved back to England.  Sister remains in the mountains.
We’ve finally had the RV garage built between the attached 2-car garage and detached 3-car garage.
My studio is still under construction.  Help Me Rhonda as the old song says.

More posts and photos in the coming days and weeks so stay tuned!


Stampaway 2023


Hello Friends,

I’ll be teaching 6 classes this year at Stampaway, giving away goodies and products.  If you’re joining, bring a tote bag…a big one!


We’re reimagining jewelry, making cards suitable for framing.


Instead of journals this year, we’ll be making ephemera holders of all shapes and sizes.  And in the same class I’m giving away storage containers, ephemera, clip art, dimensional embellishments and so much more, plus tips for where to source goodies and how to organize them.


For those who love assemblage and displaying their creations, I’ve got a great class for you!

Come back tomorrow for more sneak peeks…

Monday, May 23, 2016

Creating Art with Long Forgotten Supplies

 
If you're like me, you buy lots of art supplies.  Lots and lots!  And then you play with them once or twice and stash them in a drawer. 
 
Last week I pulled out one of my 200+ drawers in the studio and when I closed it, something fell.  So each time I opened a lower drawer, it continued to drop, preventing all those subsequent drawers from closing.  What a mess.
 
Which meant letting it fall all the way to the bottom, and using a screw driver to remove that one to retrieve the contents.  And that meant emptying the drawer that held all the acrylic paint tubes, watercolor tubes, etc.  And there I found these jars of VIVA Paper Soft Colors. 
 
Since I had to take everything out of the drawer, I decided to play with these before putting them back.  Think water colors in a tub with a sponge on top.
 
 
The first application gives you a very soft color as seen in the above photo.  And if you know me at all, you know I don't do pastels.  So that meant a second application.
 
 
Much better, right? So I repeated that process for all 4 colors and then decided to add a little interest with my stencils.
 
 
First 2 colors were the yellow and lilac.  I could've gone over them multiple times, but this is just a background process, building layers, so it really doesn't matter how pale they look at this stage.
 
 
Now I have 2 of these completed.  This one and the very first photo at the top of the blog.  Of course nothing in my art is complete until I add rubber stamp images with black ink, so you know I'll be back to show you the end result.  Mostly I wanted to encourage you to pull out something you've ignored for years and play a little.
 
I had so much fun with this that last week I invited the ladies in my art group to give it a try.  If I'd been clever, I'd have taken photos of their finished pieces.  But of course, we finished with these colorants and moved on to distress paints on tags and small white pieces of cardstock, and before you knew it, we'd run long on our meeting and everyone had to dash.
 
One of these days I'll remember to take photos.  Just not last week.  We should all be impressed that I stopped long enough to post photos at all.


Tuesday, May 10, 2016

A Little of This, A Little of That

 
What happens when you have a lot on your mind that you'd rather not think about, and lots of time?  You start a new project.  A convoluted project that requires lots of time to construct.  Seems like a good idea at the time, but before you know it, you've created a monster!  I can tell you this opens and opens and opens again, and then, just when you think you've seen it all, you discover one more flap to turn and open yet again.

The photo above shows the gate-fold front cover open, exposing lots and lots of pockets.  So yes, you can see 2 pink and one blue pocket, but look again.  There are 2 tags peeking out of the top pocket, on the left, meaning that one pocket is actually two.  And right below it, the blue pocket is built the same way, with not one, but 2 hidden pockets.  And the pink one on the bottom opens to the top, so if you look closely, you'll see a rubber stamped art doll wearing a dunce cap peeking out.  See her?

Mind you, these photos were taken days ago.  I've been working on this for over a week, so pretty much every page has been altered in one way or another, mostly with the addition of more collage sheets and clip art, using up lots of my scraps of papers.  I count 3 of Gaye Medbury's faces with the butterflies; don't you just love those?  They're scattered throughout so yes, you'll see a few more.


Okay, so now I've flipped that page to the right and ta da!, you now see a new page of identical pockets, barely decorated.  Not to worry, they don't look like this anymore.  But I haven't tucked much into these pockets because I wanted you to see something else...that border to the right of the pockets.  That's a full pocket measuring about 11 5/8" tall!  That first page has one too, but this photo shows it off a bit better.  Are you intrigued yet?


This is what the front cover looked like as the project began.  I know, I hate those papers too, but fear not, they're being covered with images almost hourly.  At first I just wanted sturdy covers with a gate fold, and thought I could live with anything.  I was mistaken.  And after I get it all covered, if I still dislike it, there's going to be an entire re-do!  I still need to make a belt or closure of some kind because the more I add inside, the more it wants to stand open.  Hence my little fingers holding it closed at the bottom.


This is after that page of pockets is flipped to the left.  Remember that big pocket I mentioned?  You can see it's a file folder.  I took this photo before I covered up that tab just so you could start imagining the process.  And there's a giveaway in this photo...2 postcards are sticking out of yet another oversized pocket.  Look there, on the right.  See them?  I'm telling you, this pocket journal is something else!!


So now I've flipped that over one more time to the left.  Still see those 2 postcards, now quite visible on the left?  There's an oversized library pocket on the top of this new page with a postcard inside it.  And that yellow pocket with the black & white checks...yes, another pocket. But those things are added onto yet another oversized pocket!


This is the true inside of the journal, so let me point out a few more details.  Down at the bottom is a gate fold of scrapbook paper given to me by my friend Michele.  Just love that paper!!  But look just above it please.  First you'll see one of my motherboard background pieces cut with a scalloped edge...that's to show you a pocket.  Just above the scallop you'll see some of Gaye Medbury's numbers collage sheet.  Yes, that's another pocket behind that tab!  Pay no attention to that postcard on the bottom right because it's already been switched out for another one I got in the mail just this week.  It's true, I'm pretty fickle with my loves.  But remember that attaching postcards with washi tape not allows them to be flipped, revealing something underneath, but also allows them to be changed quite easily.

 
This is just to show you the cool paper when you open that gate fold.  I'll alter it of course by adding more images on it, but it's wonderful just the way it is right now.


And one final shot, showing you the journal fully opened to it's 32" glory.  Still no where near complete, but isn't it a sight to see?  My local club will get to see this in person next week at our monthly meeting.  And I suspect they'll notice lots and lots of changes to what you're seeing here.

How'd you like my sneak peek?  I suspect this might show up on my teaching circuit next year.  Interested?  For the local gals, I think it might be on the calendar for this year.

Stay tuned!